
Pixel Art Character Tutorials
-
I've figured the best way to make a pixel art tutorial is visually The program I use for my art is called Piskel. I use the offline version. I have been testing several apps on the iPad like Pixel Art Pro and Pixure also, but they don't have all of the features I like to use.
I think the largest you would ever have to make your canvas is 128x128. These dimensions provide a great amount of details and not too much where it is difficult to animate the character.
Hope these examples help!
-
Name: m_chr_1
Gender: Male
Size: 64 x 64
Head dimensions: 3x5 (width x height)
Shoulder width: 5px
Torso height: 10px
Leg height: 31px
Foot width: 4px
Hands: Yes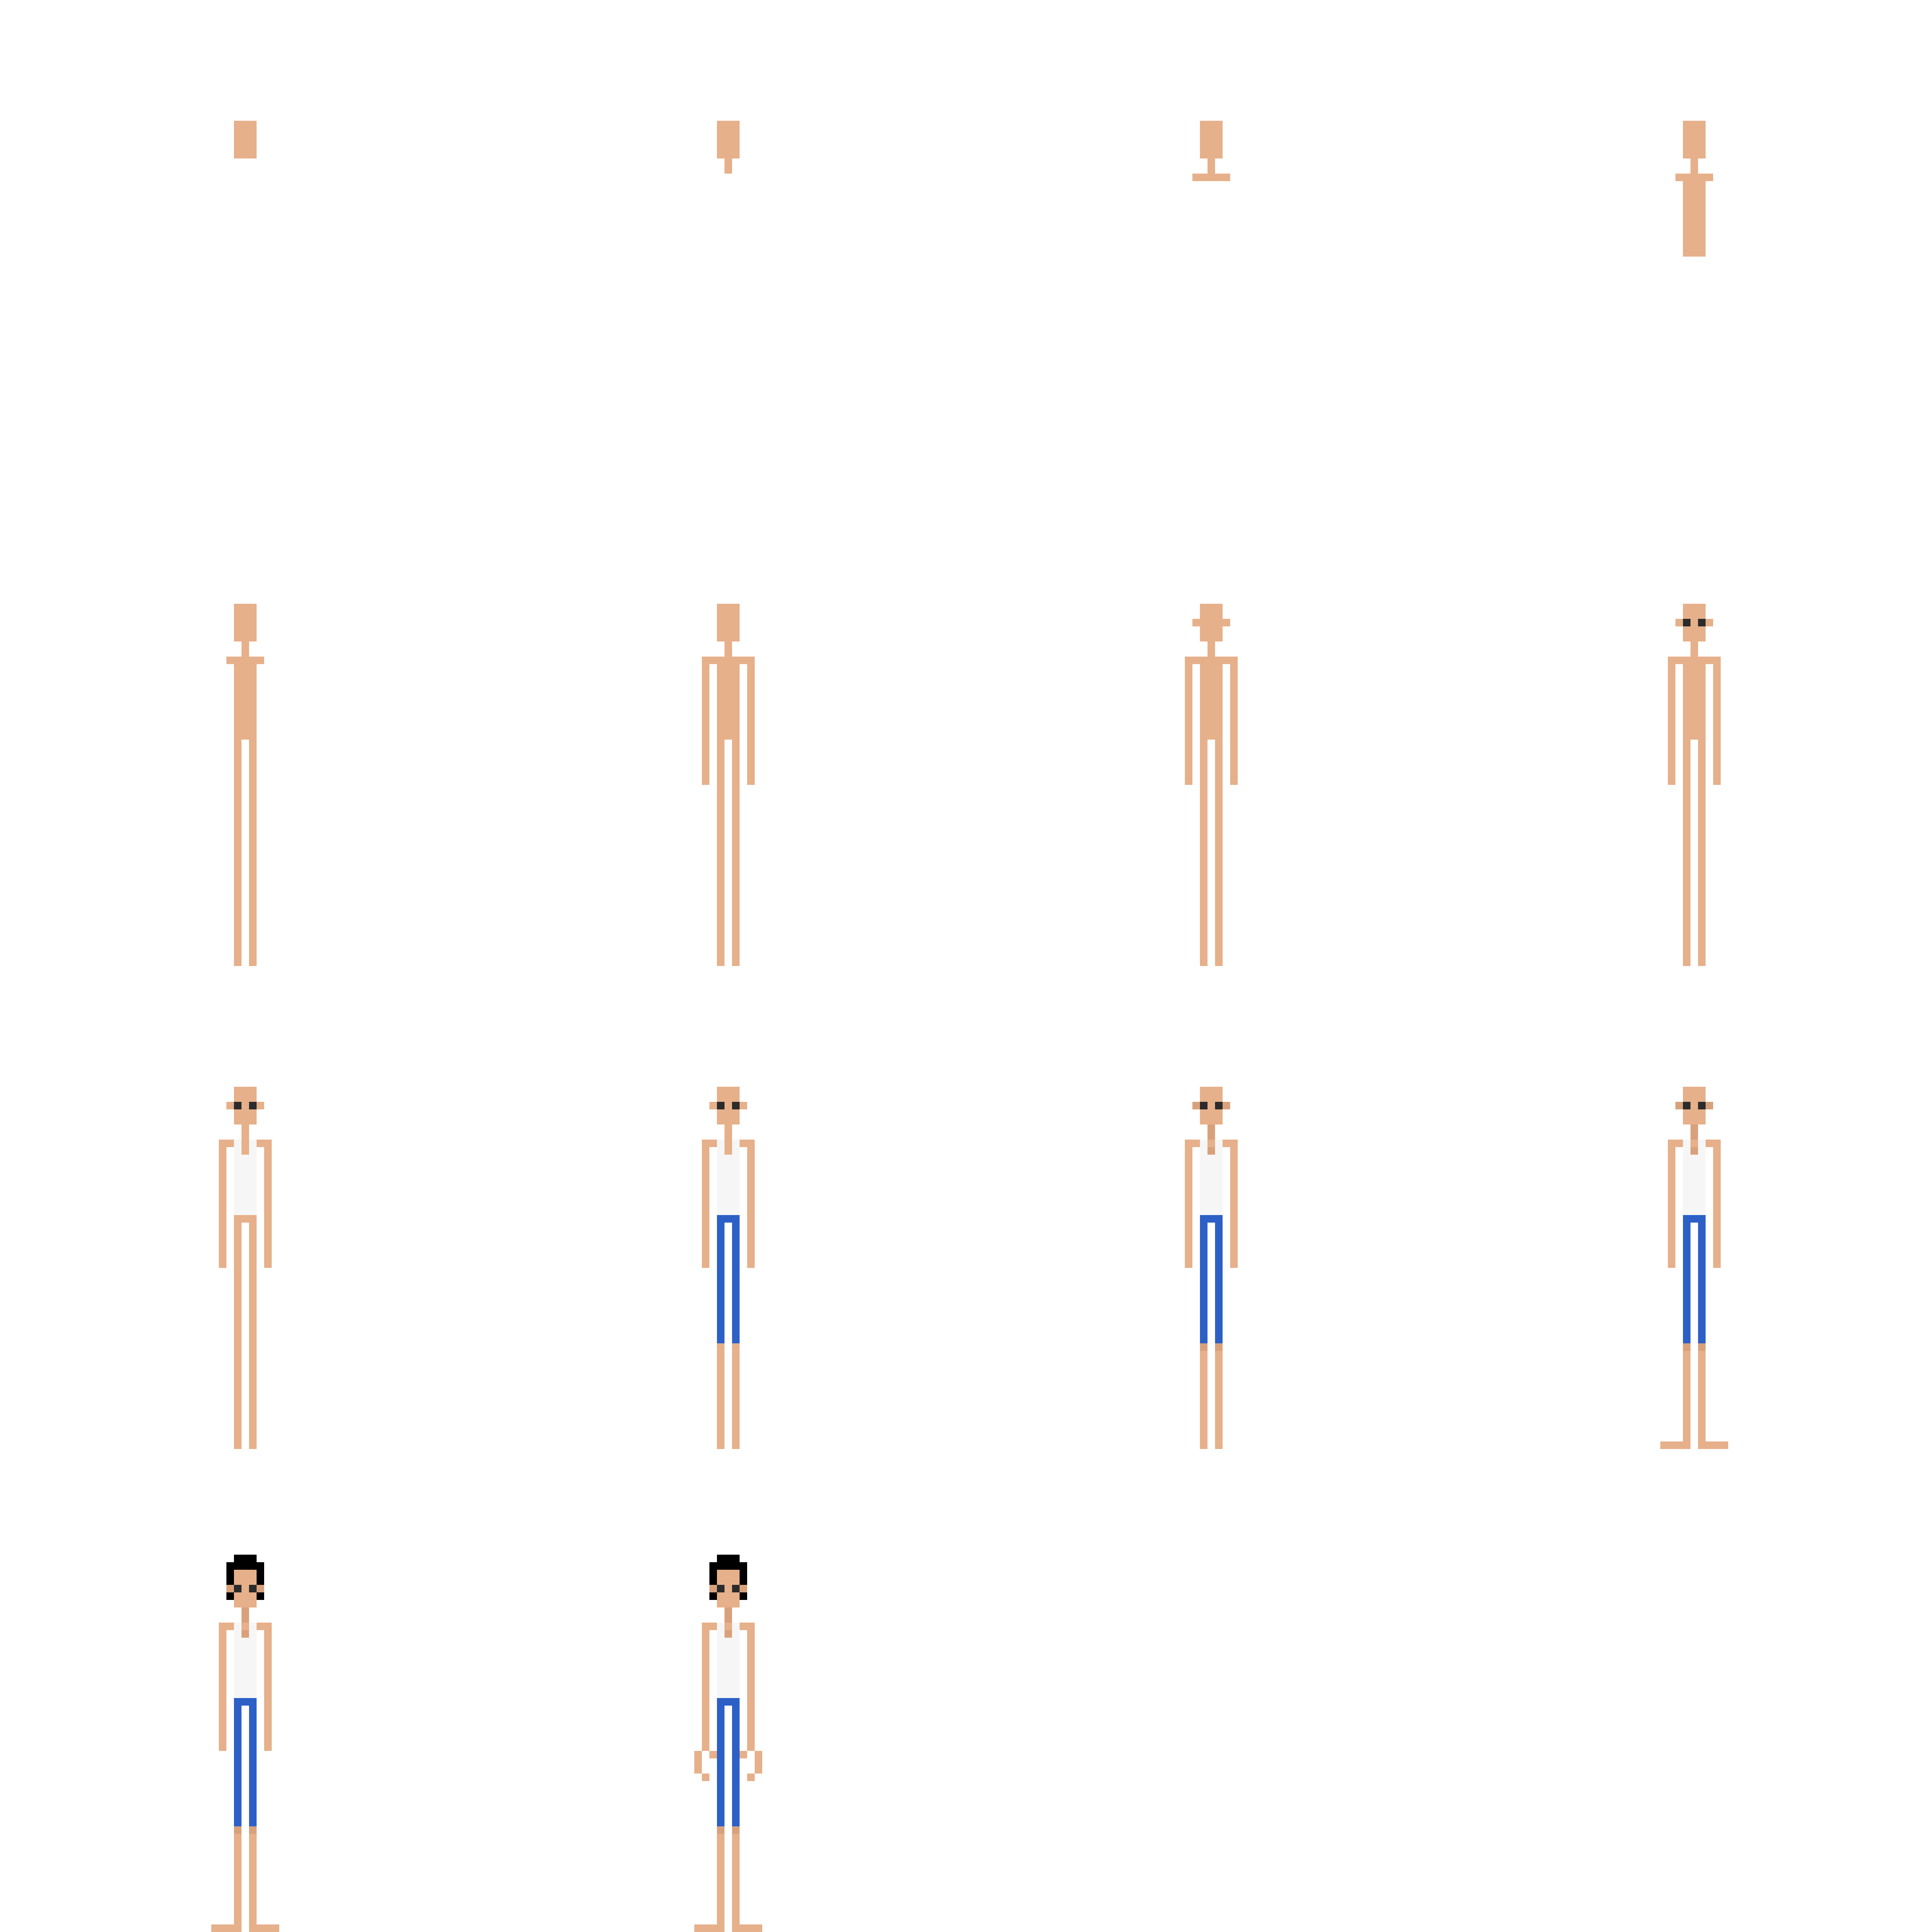
-
Name: f_chr_1
Gender: Female
Size: 64 x 64
Head dimensions: 3x4 (width x height)
Shoulder width: 5px
Torso height: 9px
Leg height: 28px
Foot width: 4px
Hands: No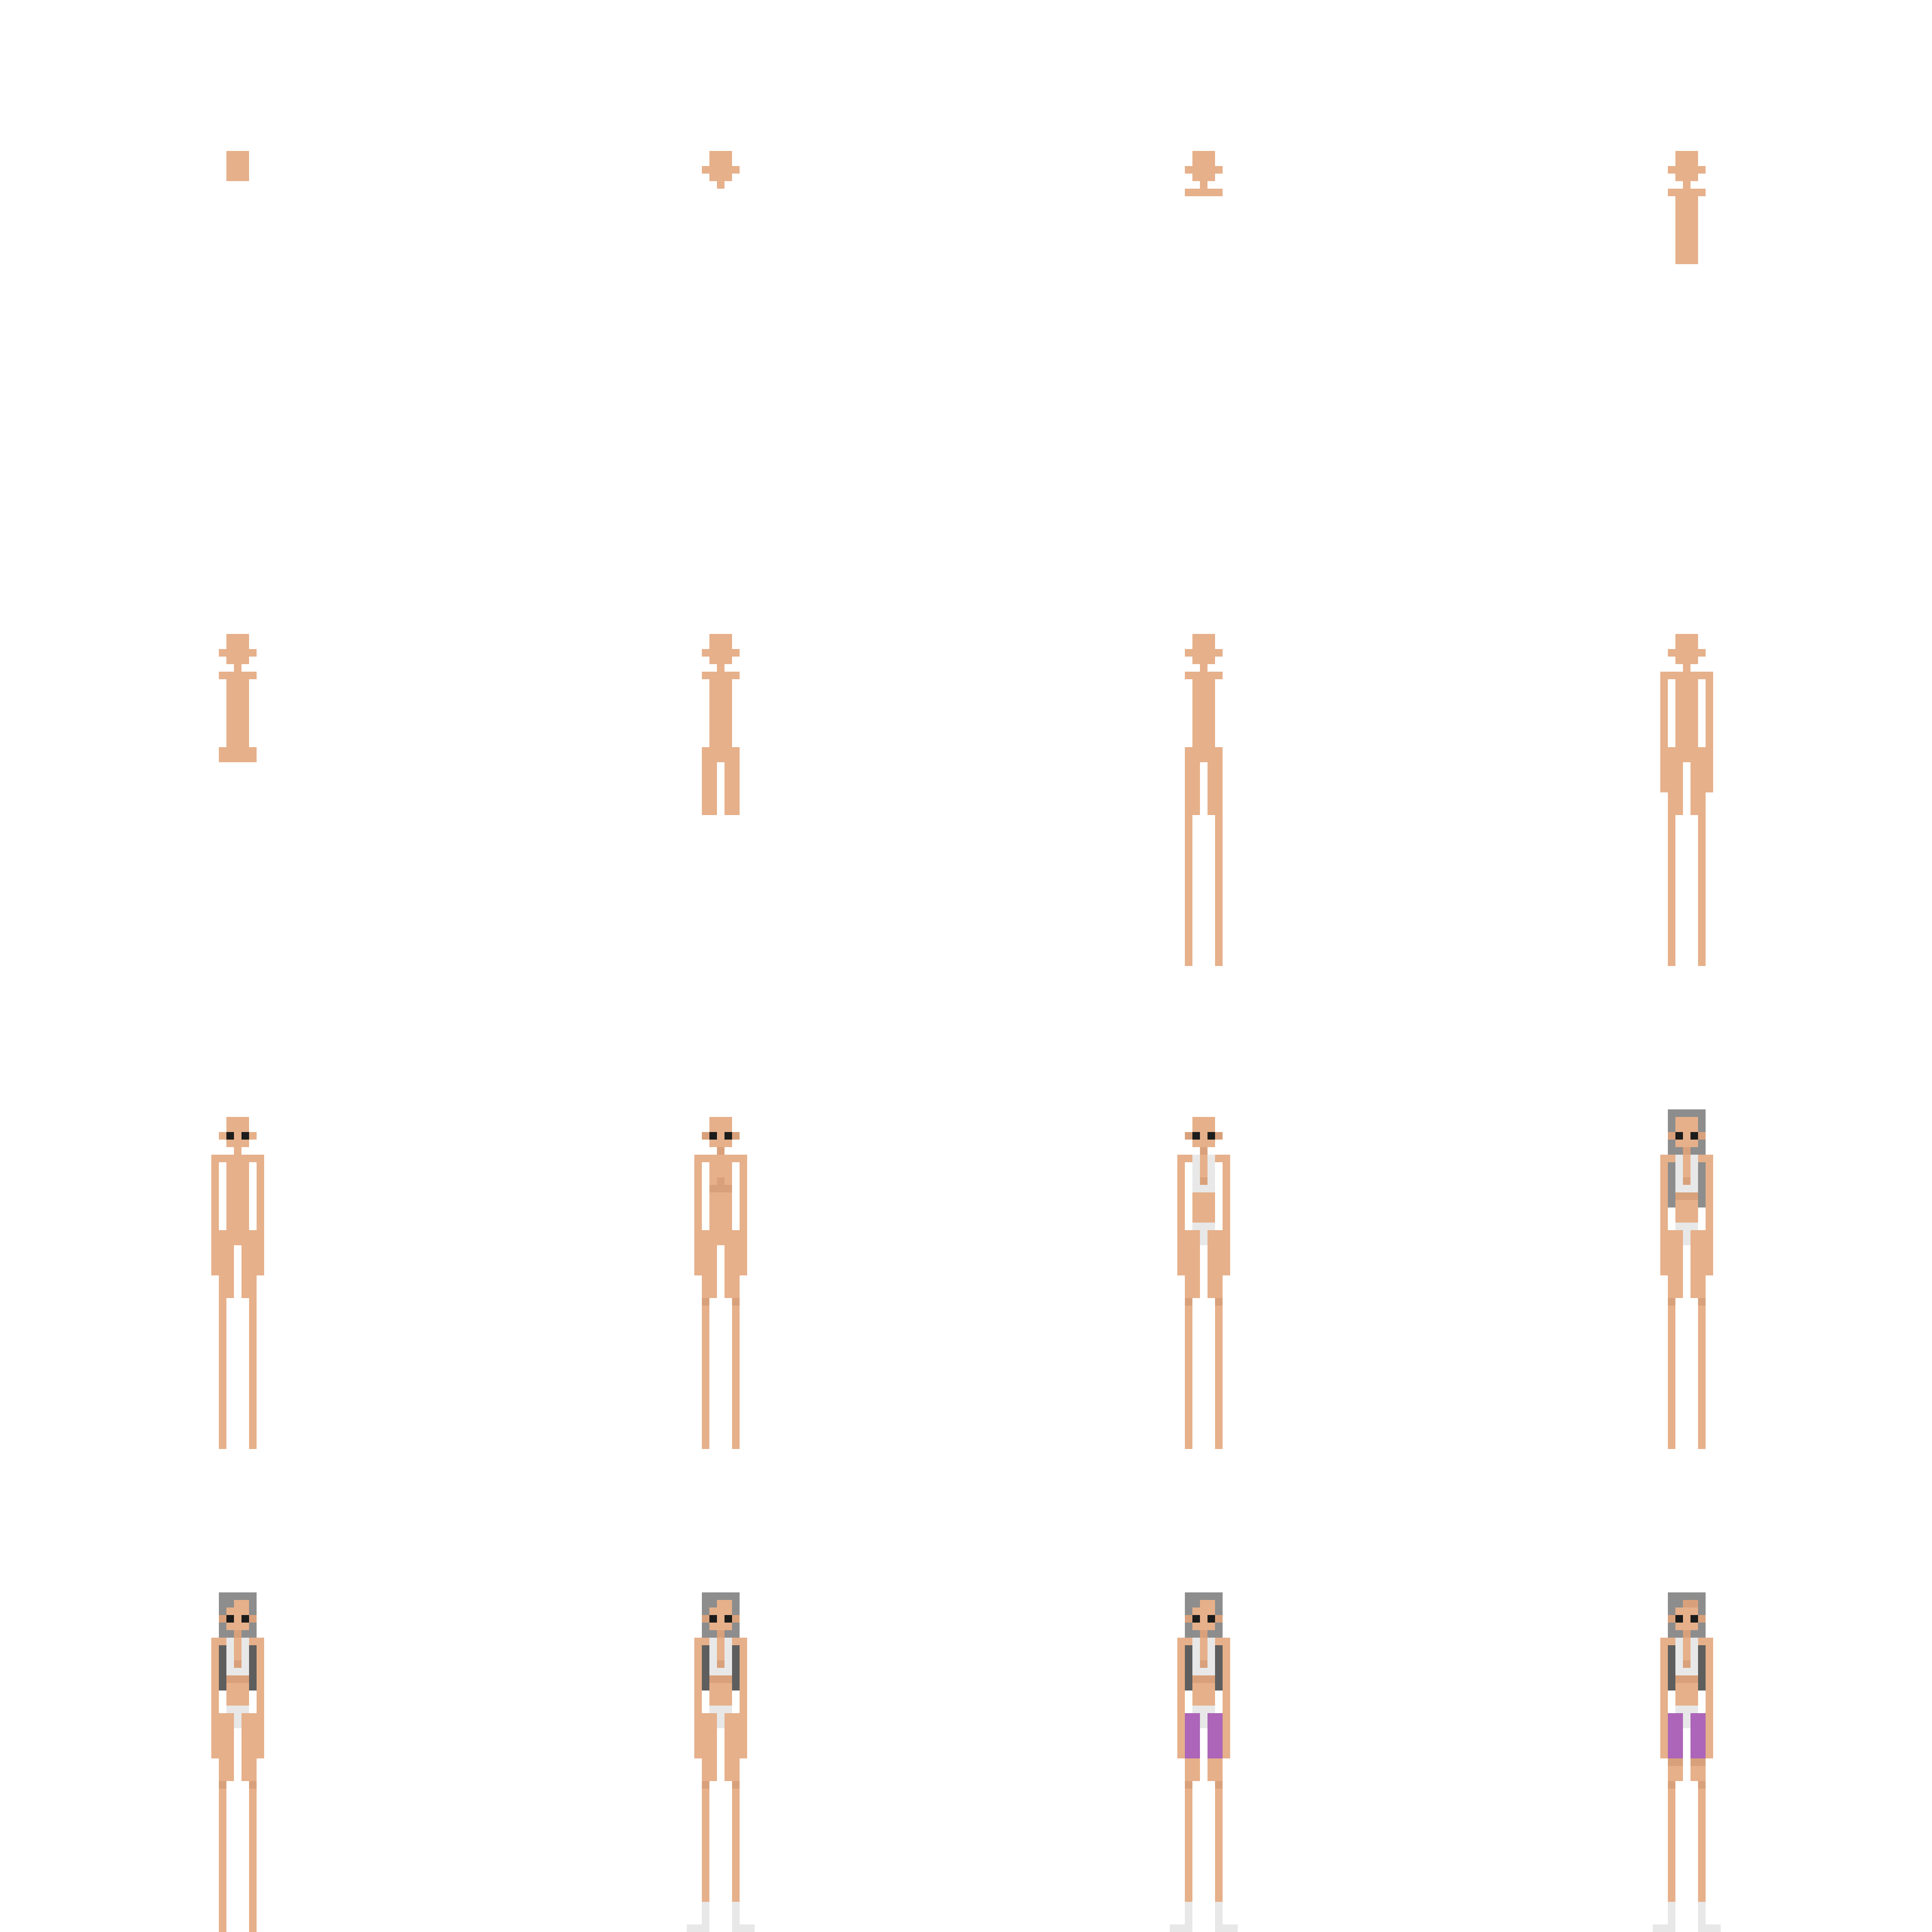
-
Name: m_chr_2_side
Gender: Male
Size: 64 x 64
Head dimensions: 3x5 (width x height)
Shoulder width: 2px
Torso height: 13px
Leg height: 27px
Foot width: 4px
Hands: Yes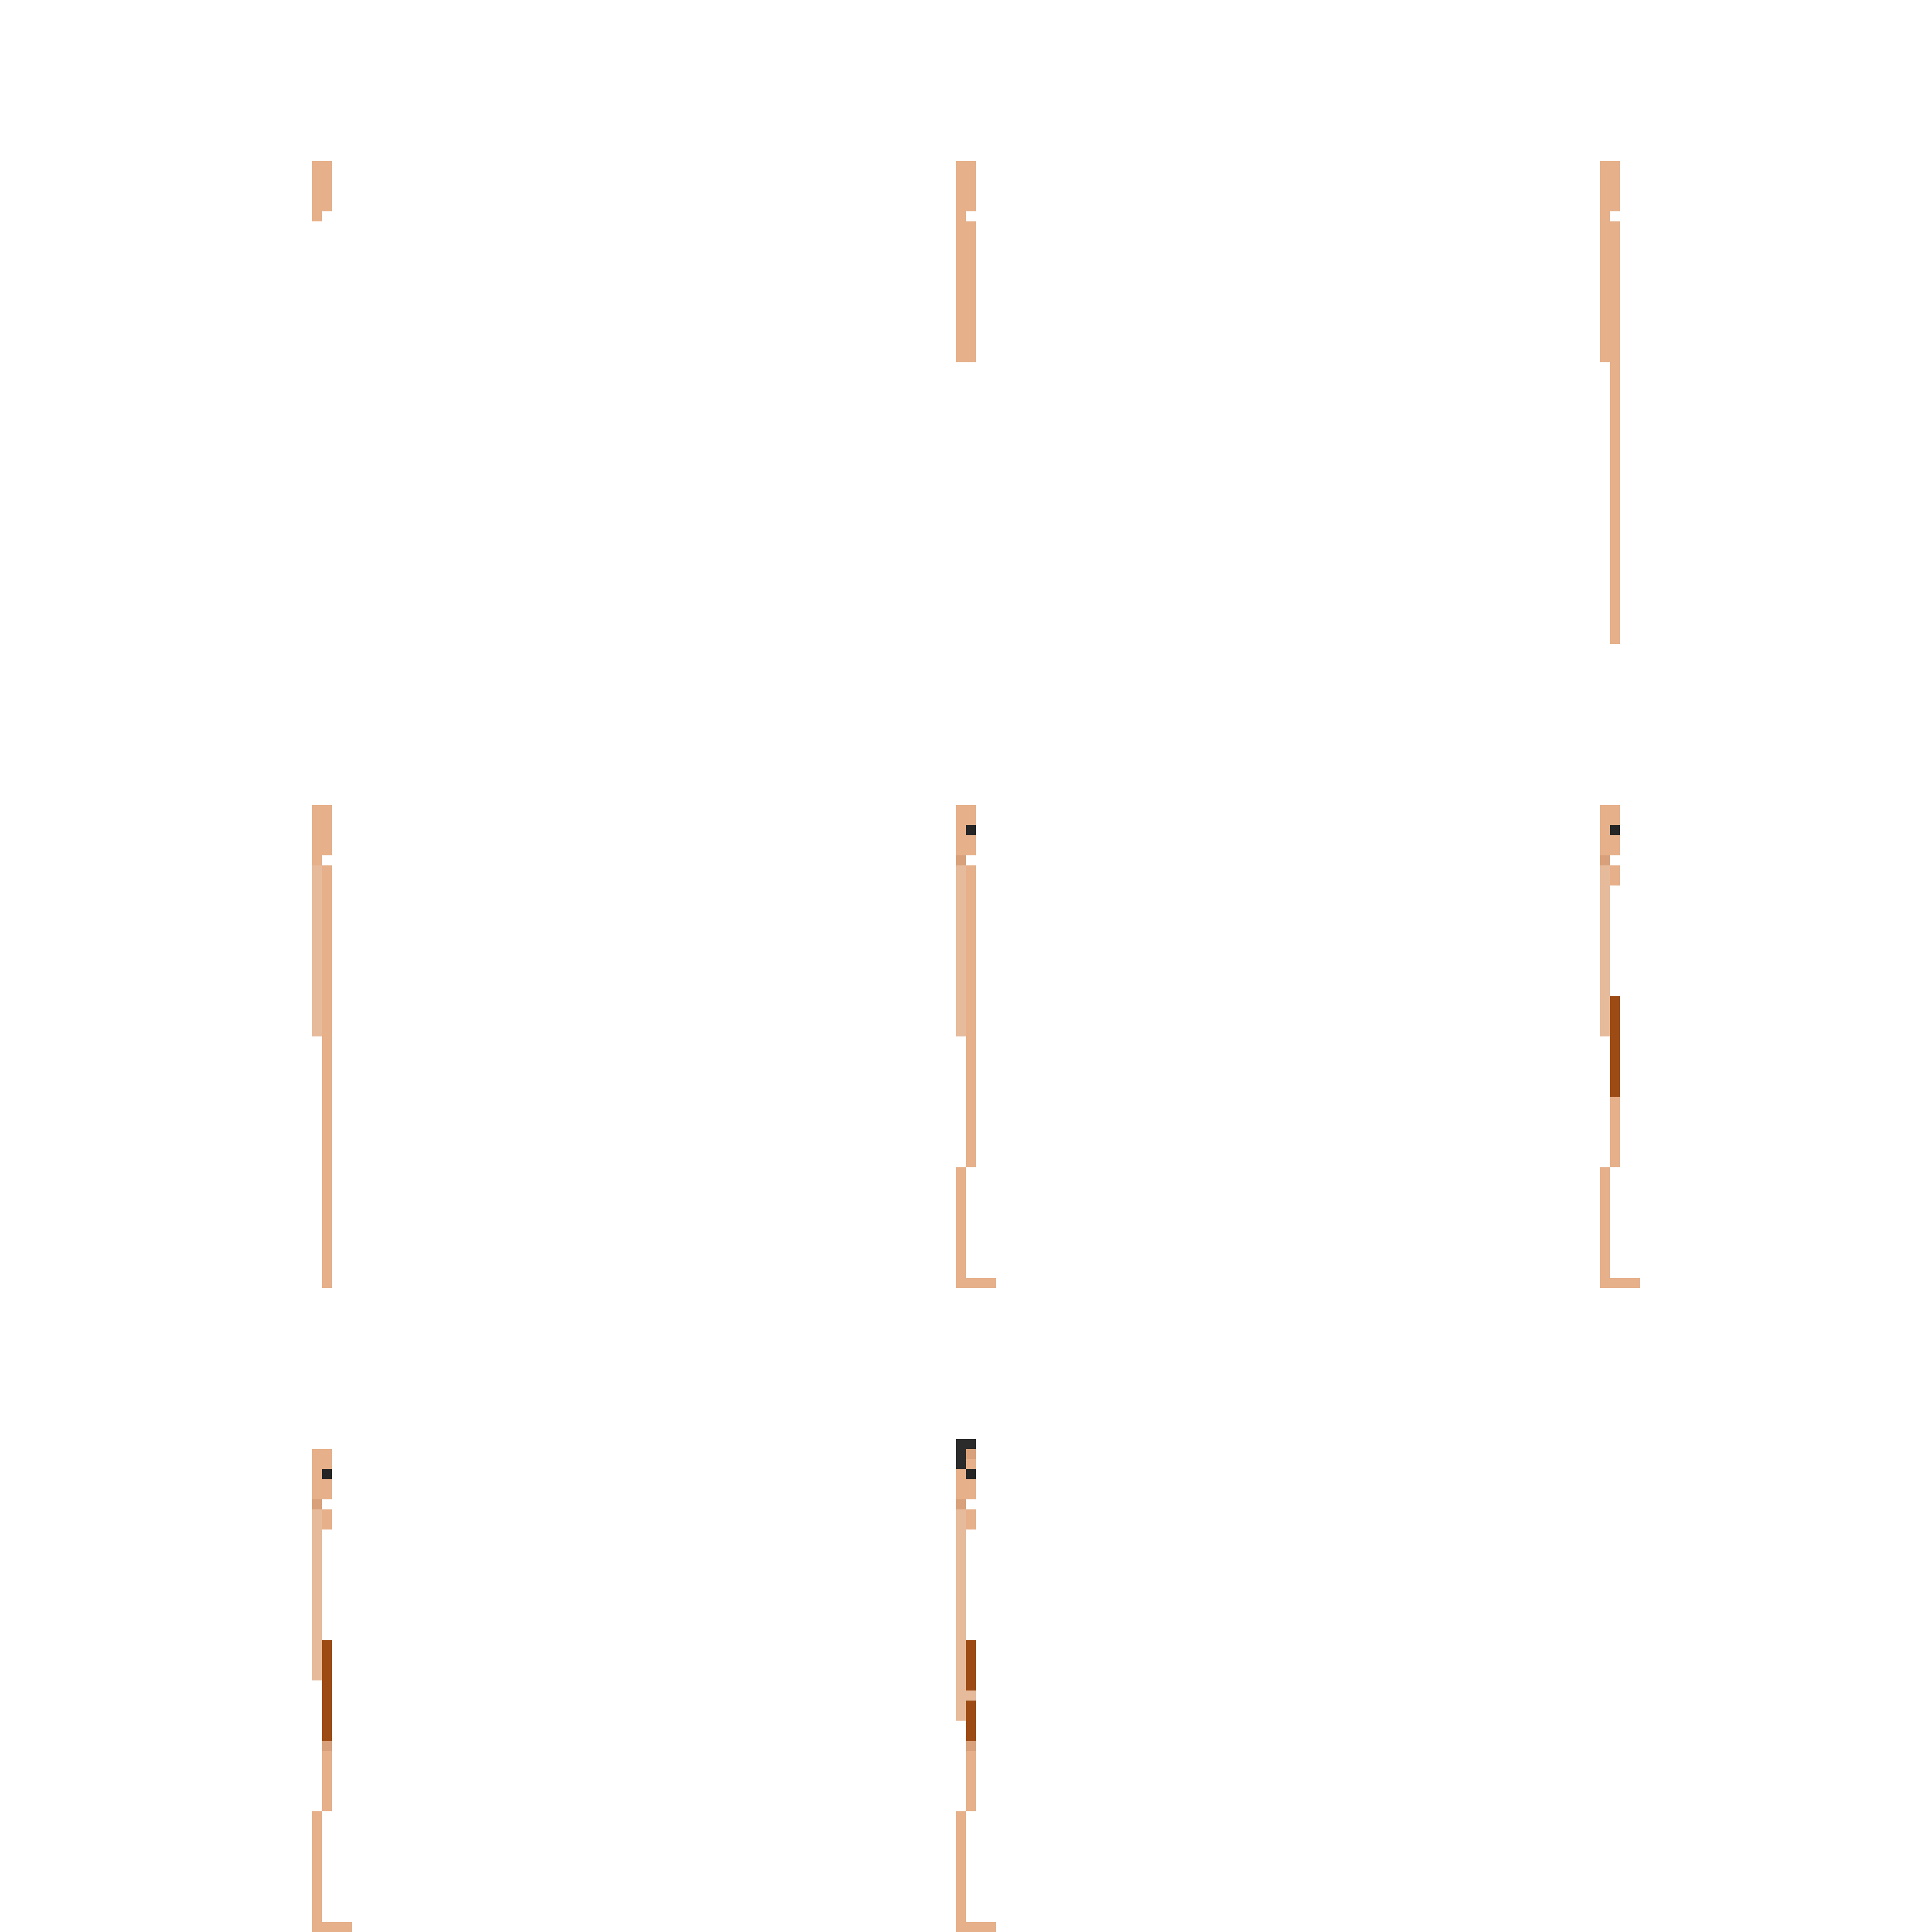
-
@mc-games Thank you. Yes. I use Piskel for animation also. Close to finding something for iPad (if the devs actually listen to my feedback).
-
Going to do a tutorial for something like this next. This is what you can achieve at 128x128. Generally, if I want to convert a 64x64 image to a more detailed 128x128 image, I will scale it up in Piskel and use the Line tool to draw the outlines and fill them in with solid color.

-
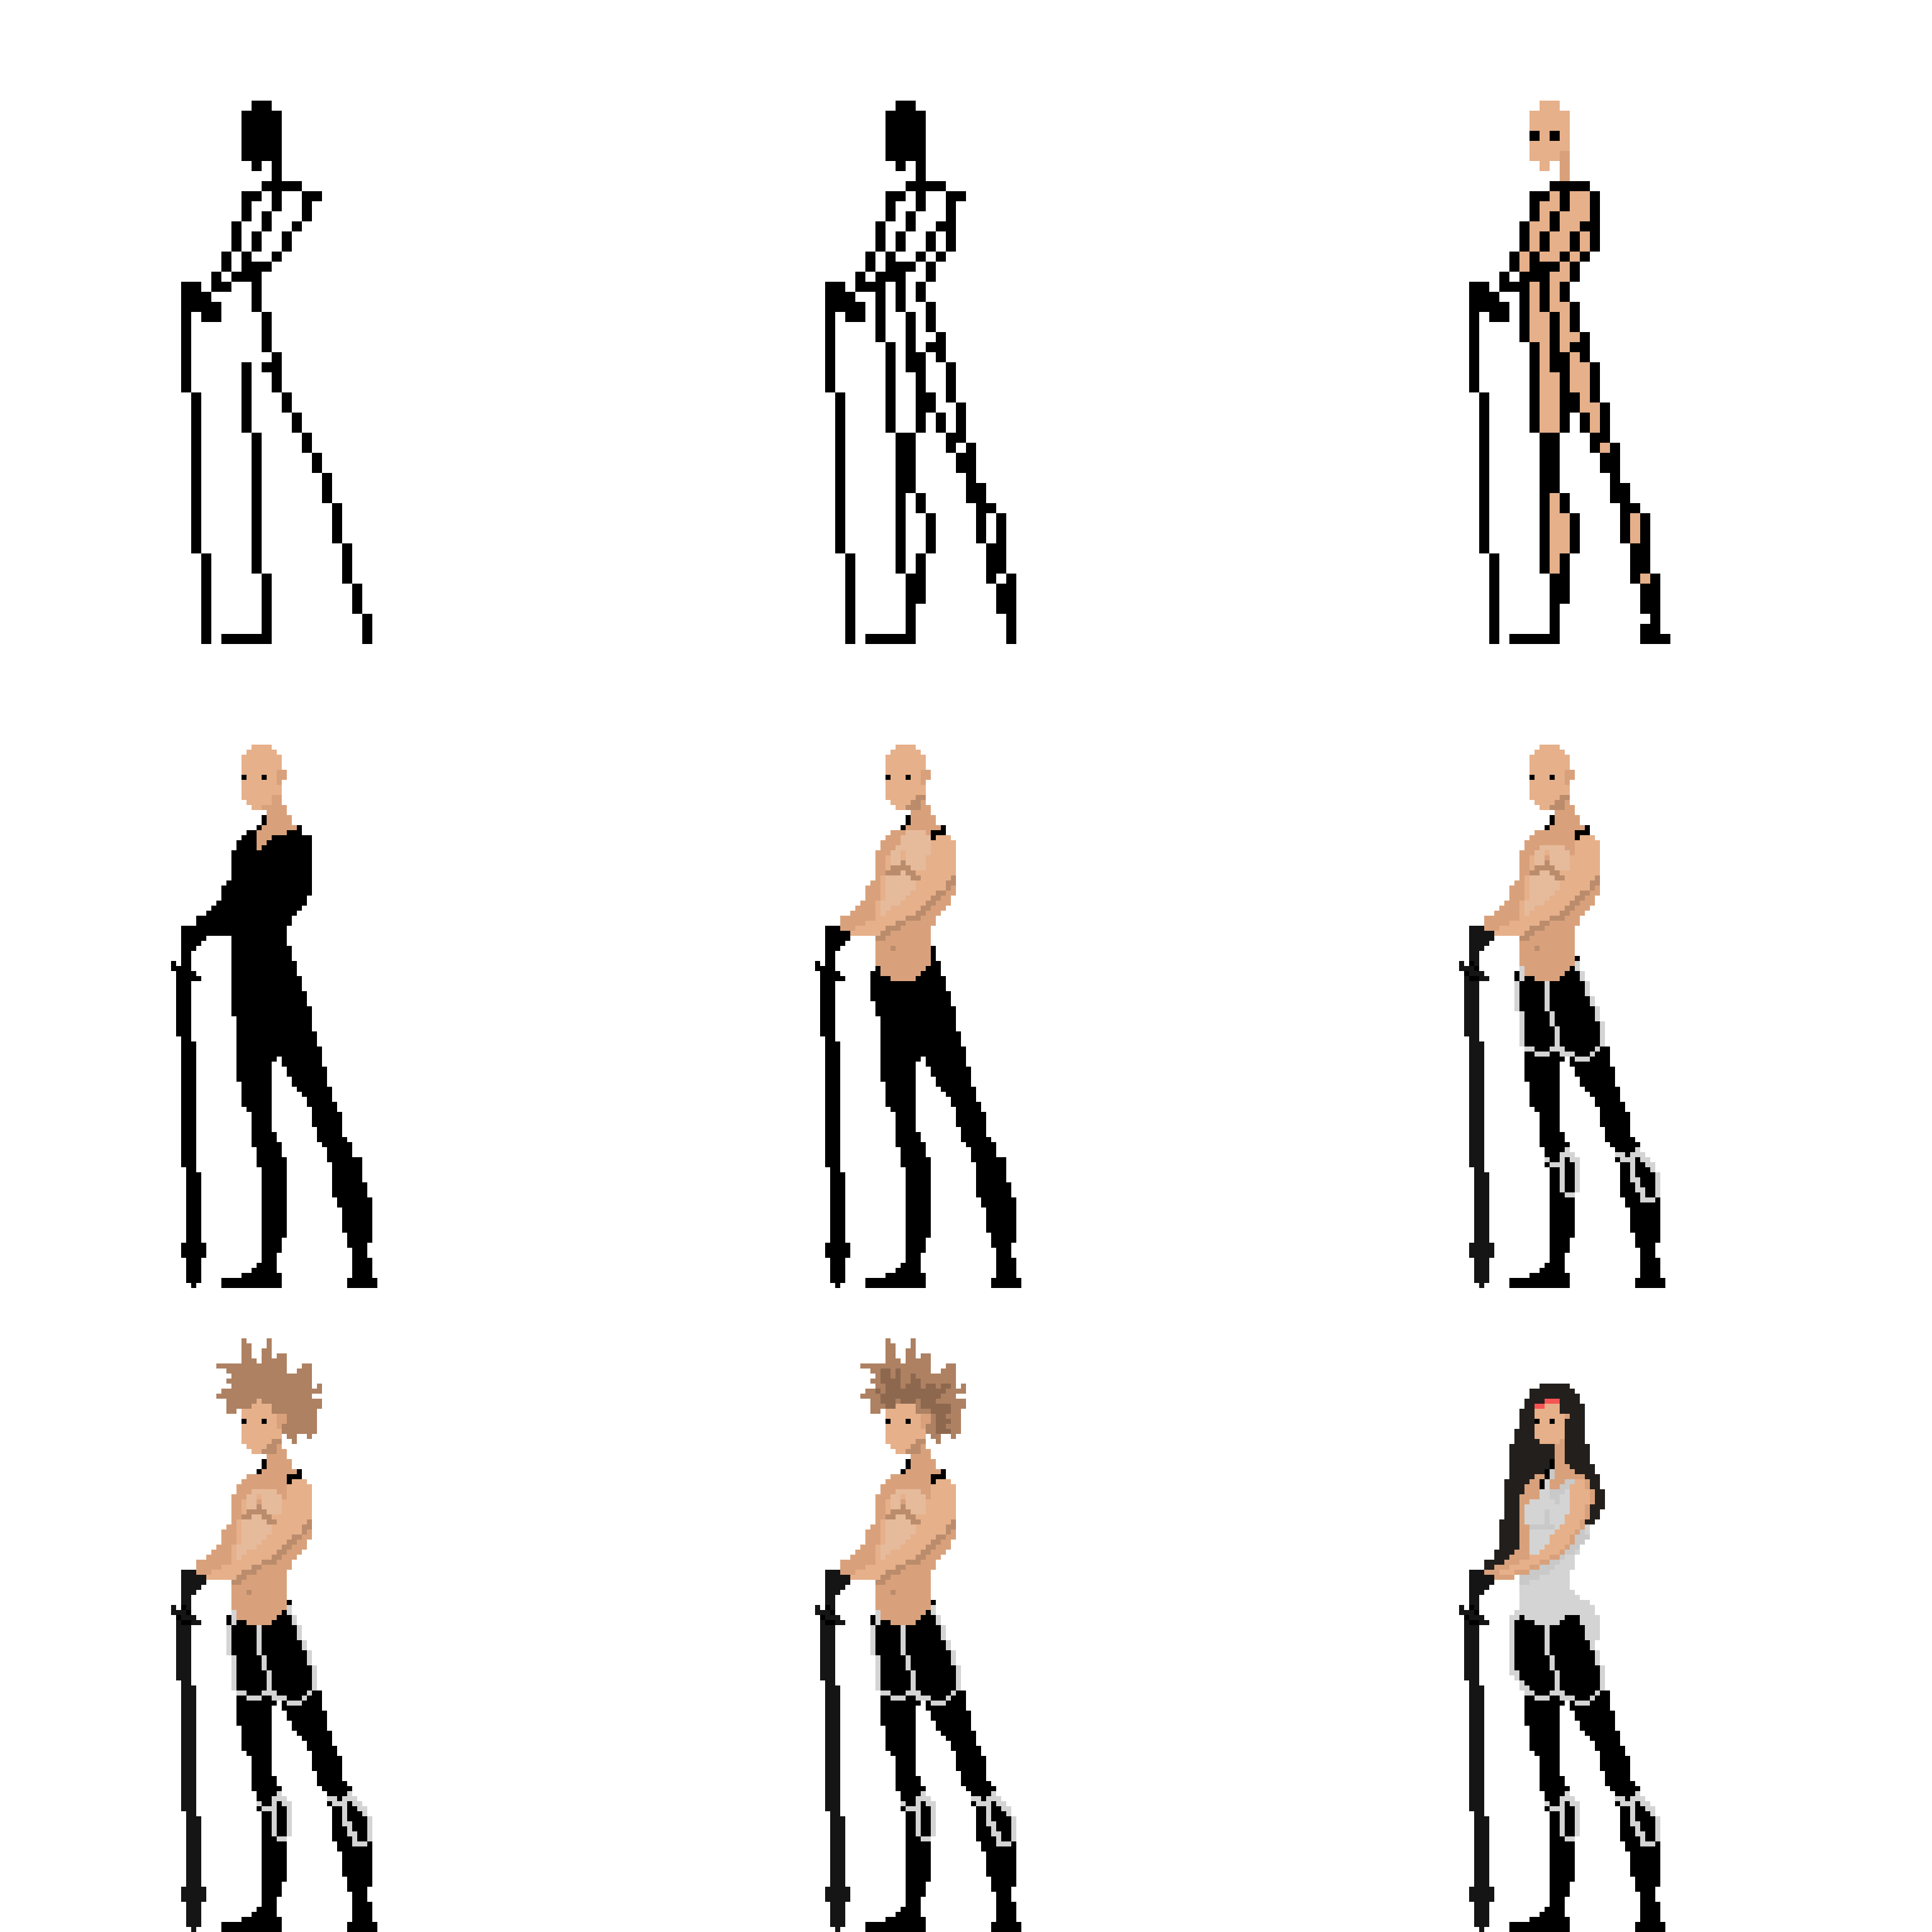
- Set canvas to 64x64 (remember that the head is roughly 5 pixels high).
- Draw a stick figure of the character. Place points at key angle changes to get an idea of where lines will be drawn (Ex. the shoulders, hips, knees, feet etc.) Think "joints." When drawing the sticks, don't draw them as interior lines, but draw them as outlines. For example, for the leg, the stick represents the outline of the thigh, knee and shin, not simply the direction of the leg.
- Next, draw triangles to suggest shape (Ex. Draw a triangle from the hip to the knee to suggest the thigh.
- Fill in the shapes with a skin color
- After the 3rd step, change the canvas size to 128x128 and draw a silhouette of the character in all black. Keep the head in the flesh tones.
- Scribble in the shape of the arms or legs using different shades to suggest shadows.
- From there on, add details.
Note: When trying to figure out shapes, I usually outline the muscles with contrasting color and then fill in the shape with either the flesh or clothing tones (see the pants with the white outlines).
Note: I googled "pose" to find a pose to work with from.
With a few tweaks (knowing the key differences between male and female) you can use the same frames to create a female (her neck should be shorter).
-
- Set canvas to 64x64 (remember that the head is roughly 5 pixels high).
- Draw a stick figure of the character. Place points at key angle changes to get an idea of where lines will be drawn (Ex. the shoulders, hips, knees, feet etc.) Think "joints." When drawing the sticks, don't draw them as interior lines, but draw them as outlines. For example, for the leg, the stick represents the outline of the thigh, knee and shin, not simply the direction of the leg.
- Next, draw triangles to suggest shape (Ex. Draw a triangle from the hip to the knee to suggest the thigh.
- Fill in the shapes with a skin color
- After the 3rd step, change the canvas size to 128x128 and draw a silhouette of the character in all black. Keep the head in the flesh tones.
- Scribble in the shape of the arms or legs using different shades to suggest shadows.
- From there on, add details.
Note: When trying to figure out shapes, I usually outline the muscles with contrasting color and then fill in the shape with either the flesh or clothing tones (see the pants with the white outlines).
Note: I googled "pose" to find a pose to work with from.
With a few tweaks (knowing the key differences between male and female) you can use the same frames to create a female (her neck should be shorter).
@TutorialDoctor the pose tutorial is really good, the only problem was that I had to change the forum background because I had mine as black, so maybe consider adding a plain background when posting on the forum. I like the pose tutorial because the characters look more realistic than the previous examples. The only problem I have is they have a pretty blank facial expression, but I think that's more due to the fact it's pixel art.
-
@TutorialDoctor the pose tutorial is really good, the only problem was that I had to change the forum background because I had mine as black, so maybe consider adding a plain background when posting on the forum. I like the pose tutorial because the characters look more realistic than the previous examples. The only problem I have is they have a pretty blank facial expression, but I think that's more due to the fact it's pixel art.
@Jack8680 Thanks. I didn't consider the background issue. I will remember that. To get more detail in the face you would probably have to go up to 256x256 (unless the size of your character is planned a bit better).
I'd say that learning to create the art at 32x32, 64x64 and 128x128 is beneficial because you can use each one as a LOD (level of detail) to represent the character at different viewpoints (close or far). At 256x256 it gets a bit more difficult to animate (even at 128x128 it is hard to animate). I tend to animate the character at 64x64 and then add details for each frame once I have scaled it to 128x128.
You can create a Mario-like character at 32x32. My Wreck-It-Ralph character was created at 64x64 I believe.
-
Heads @ 64x64
3/4, Front, and Side views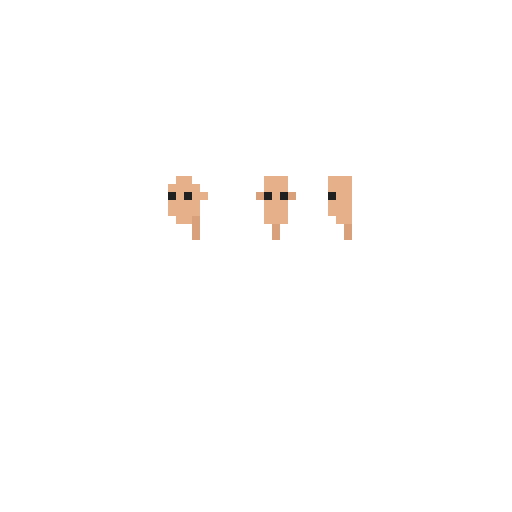
-
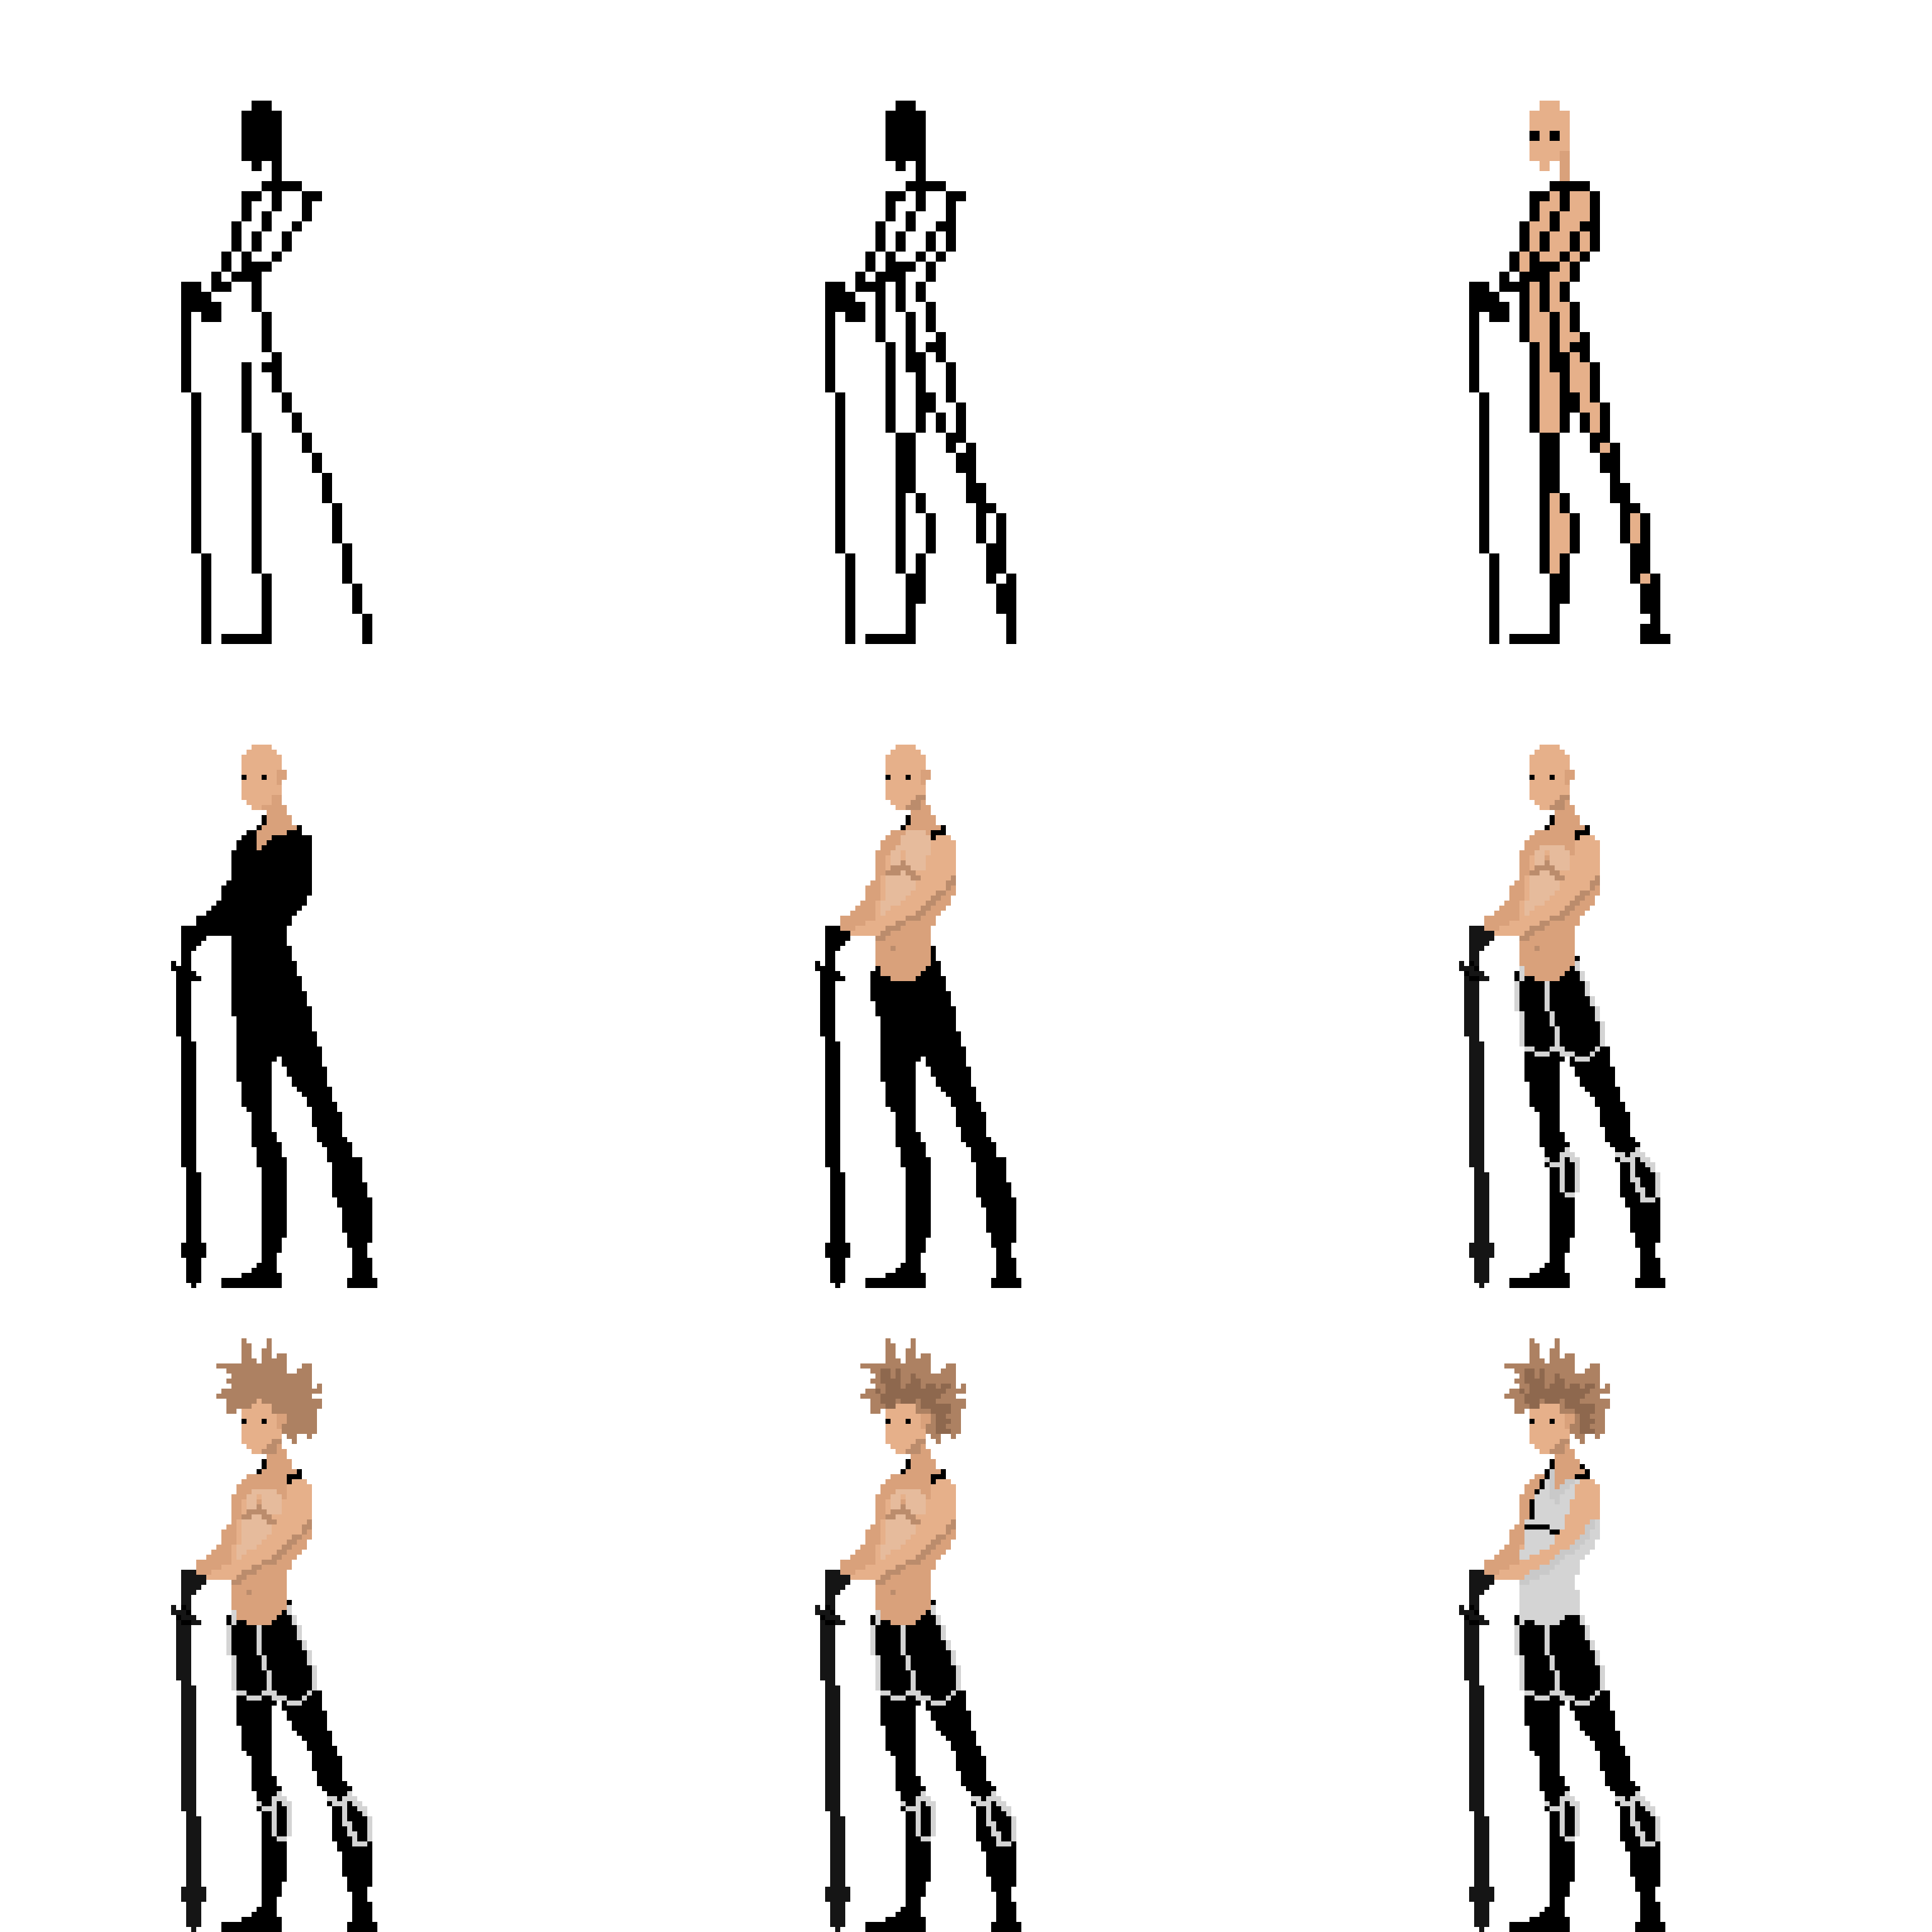
Animation
- Draw the full character using the steps for the 128x128 drawing (design the full character).
- Draw the extreme poses (in stick-person form).
- Now for the breakdowns
- You can also do in-betweens for smoother animations.
- Next do the triangle pass for the stick figures.
- Lastly do the solid/shape pass.
Note: I actually used straight-ahead for this (no extreme, breakdowns or in-betweens), but I added those instructions if you wanted to know how to animate it that way. Also, I copied and pasted the head for the other frames.
Stick Poses

Triangle Pass
Solid/Shape Pass
Gif
-
Most of the time, you will need only three types of color. The shadow color, the midtone color and the highlight color.

-
What makes a cat a cat?
One questions you should always ask yourself when designing characters is "what makes this character unique." If you are designing a cat, the first thing you should ask is "what makes a cat a cat?" In other words, what key visual features does a cat have that makes it distinguishable from other animals?
For a cat, a triangle nose, triangle ears, and whiskers are three key features that make a cat a cat. Whether you give it a box shaped head or a round head, or a triangle head, if you don't have the triangle nose, the triangle ears, and the whiskers, it is not a cat.
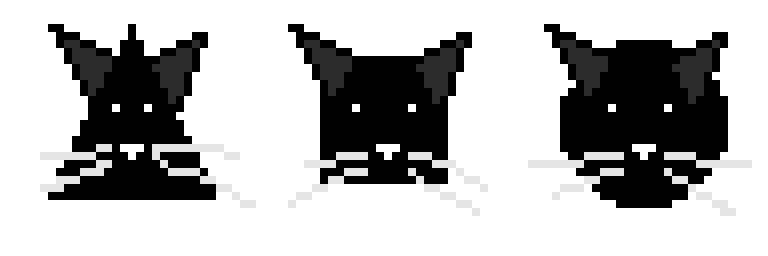
In the images above, with the triangle ears and the triangle nose, this still wasn't a cat, but when I added those whiskers, all the details needed to convey a cat were present. Any other details are for personality or to enhance the uniqueness of the individual cat.
-
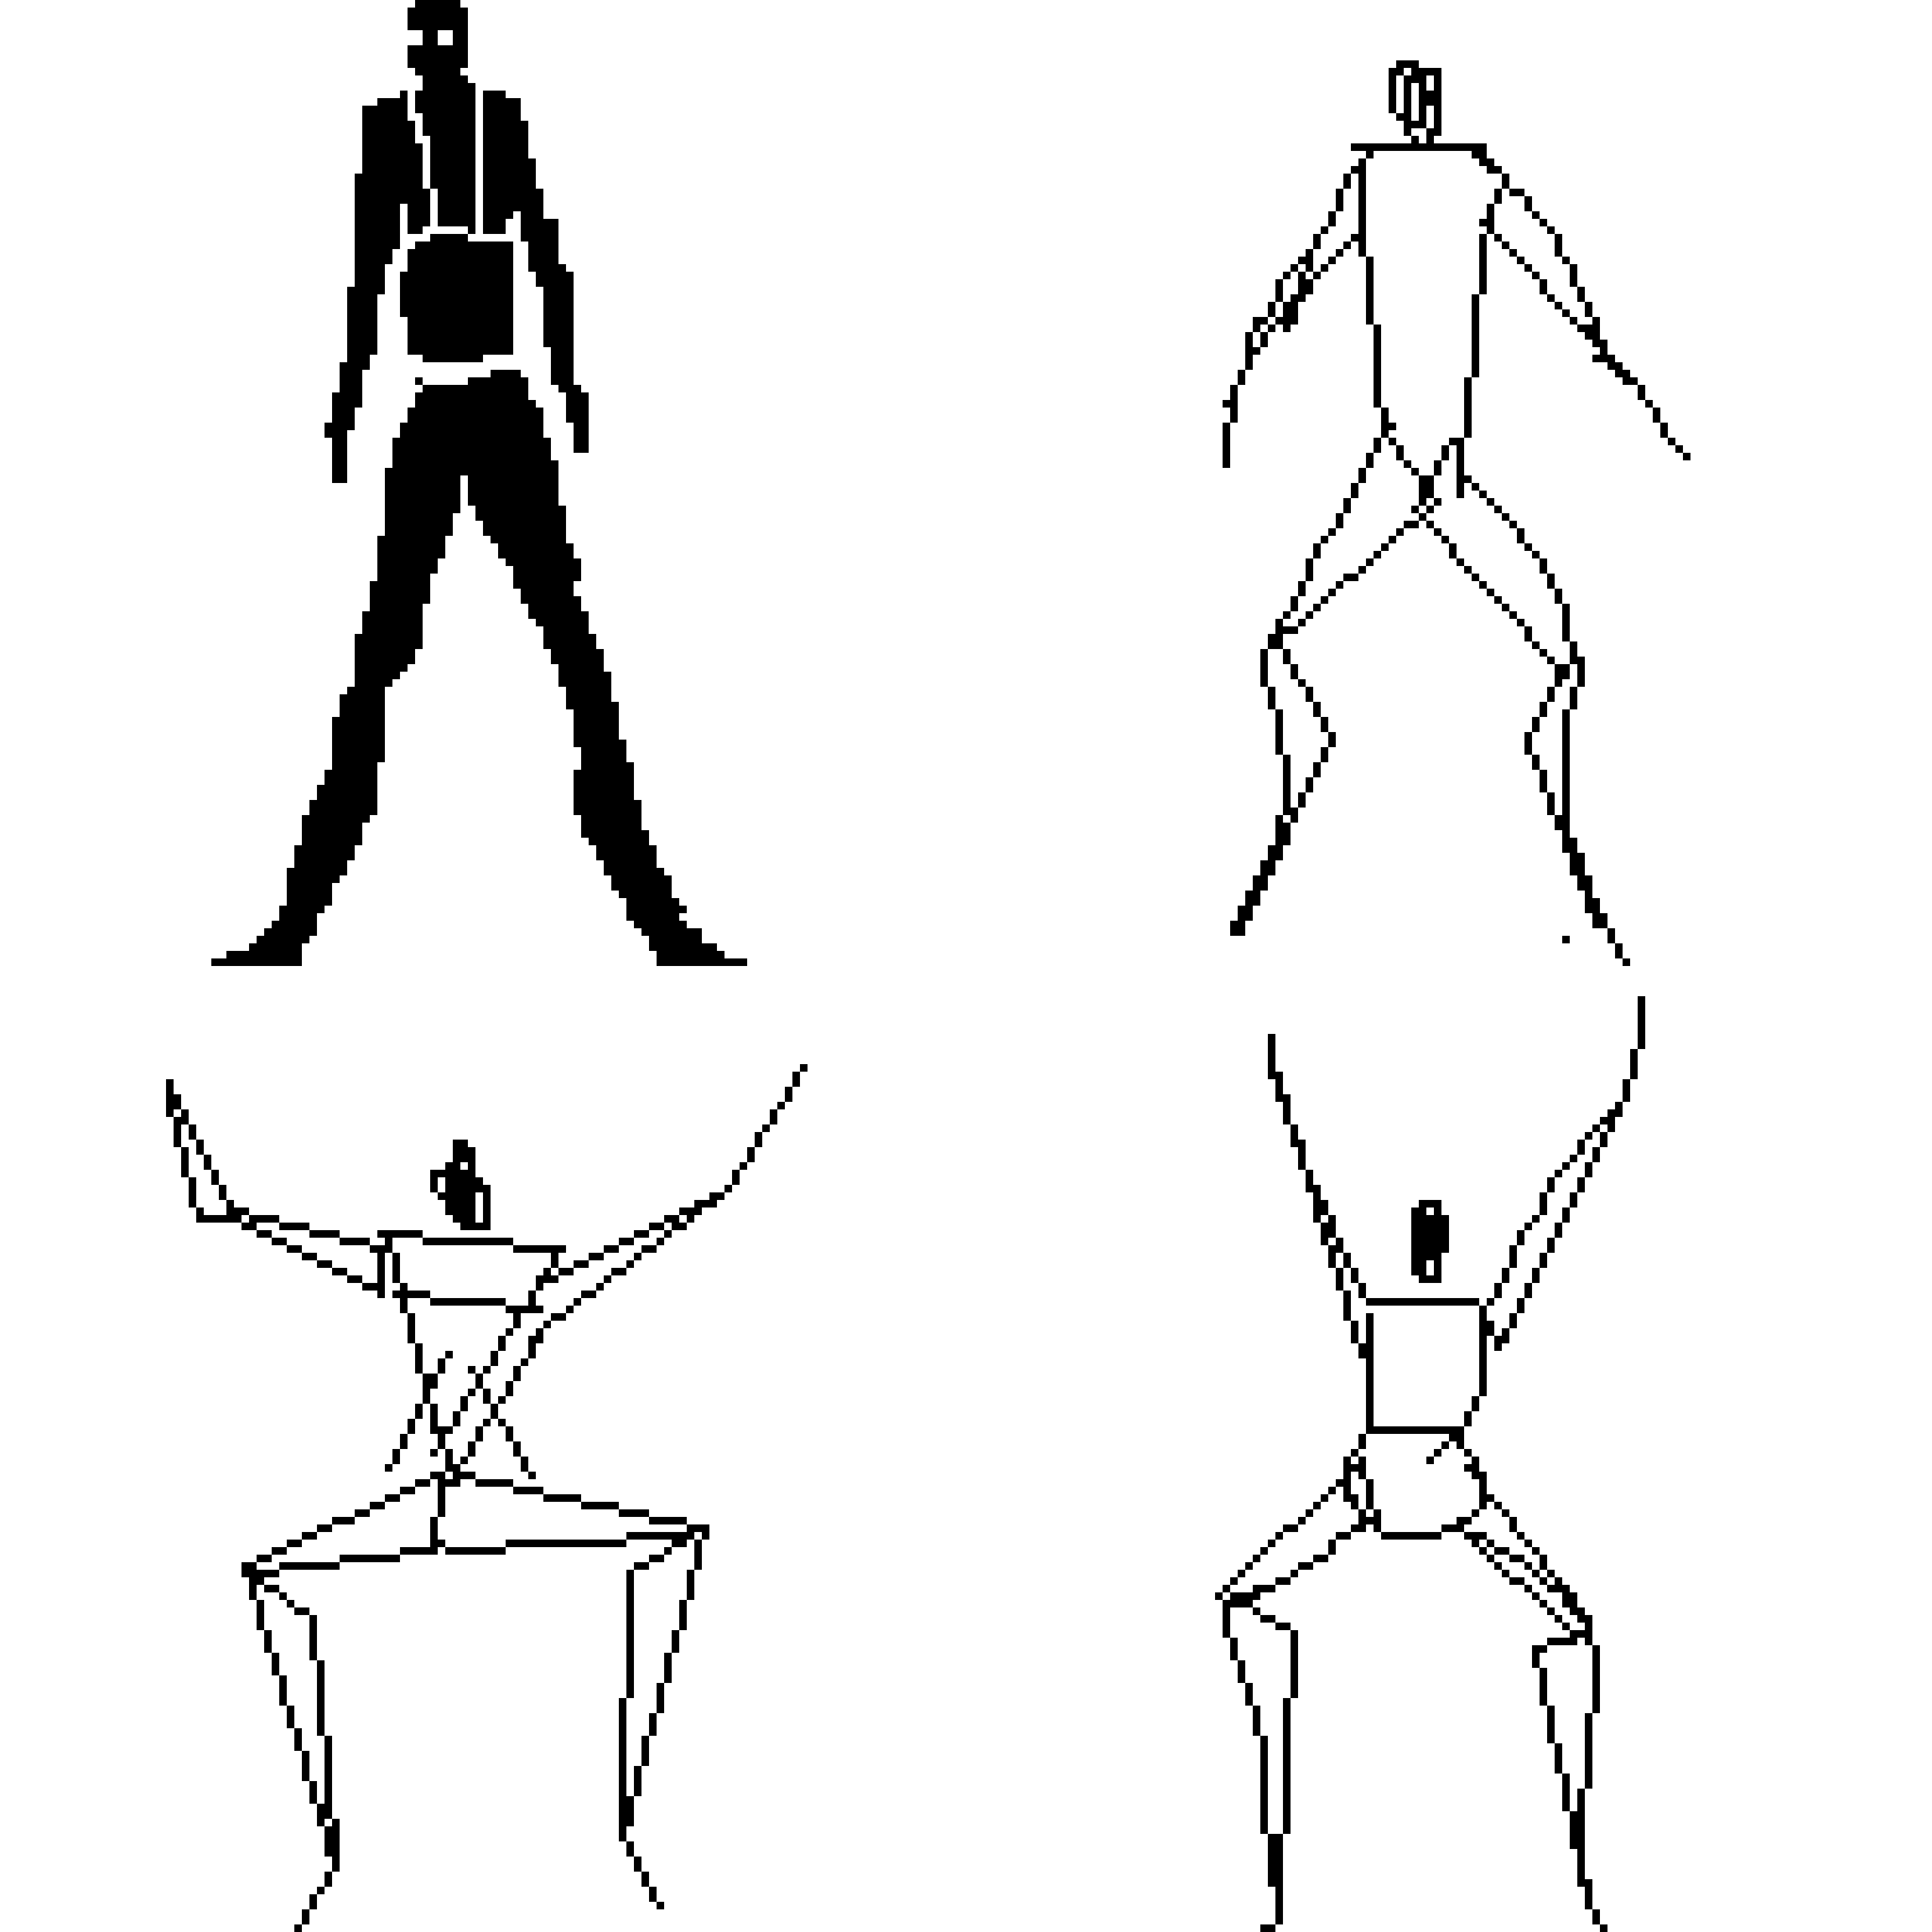
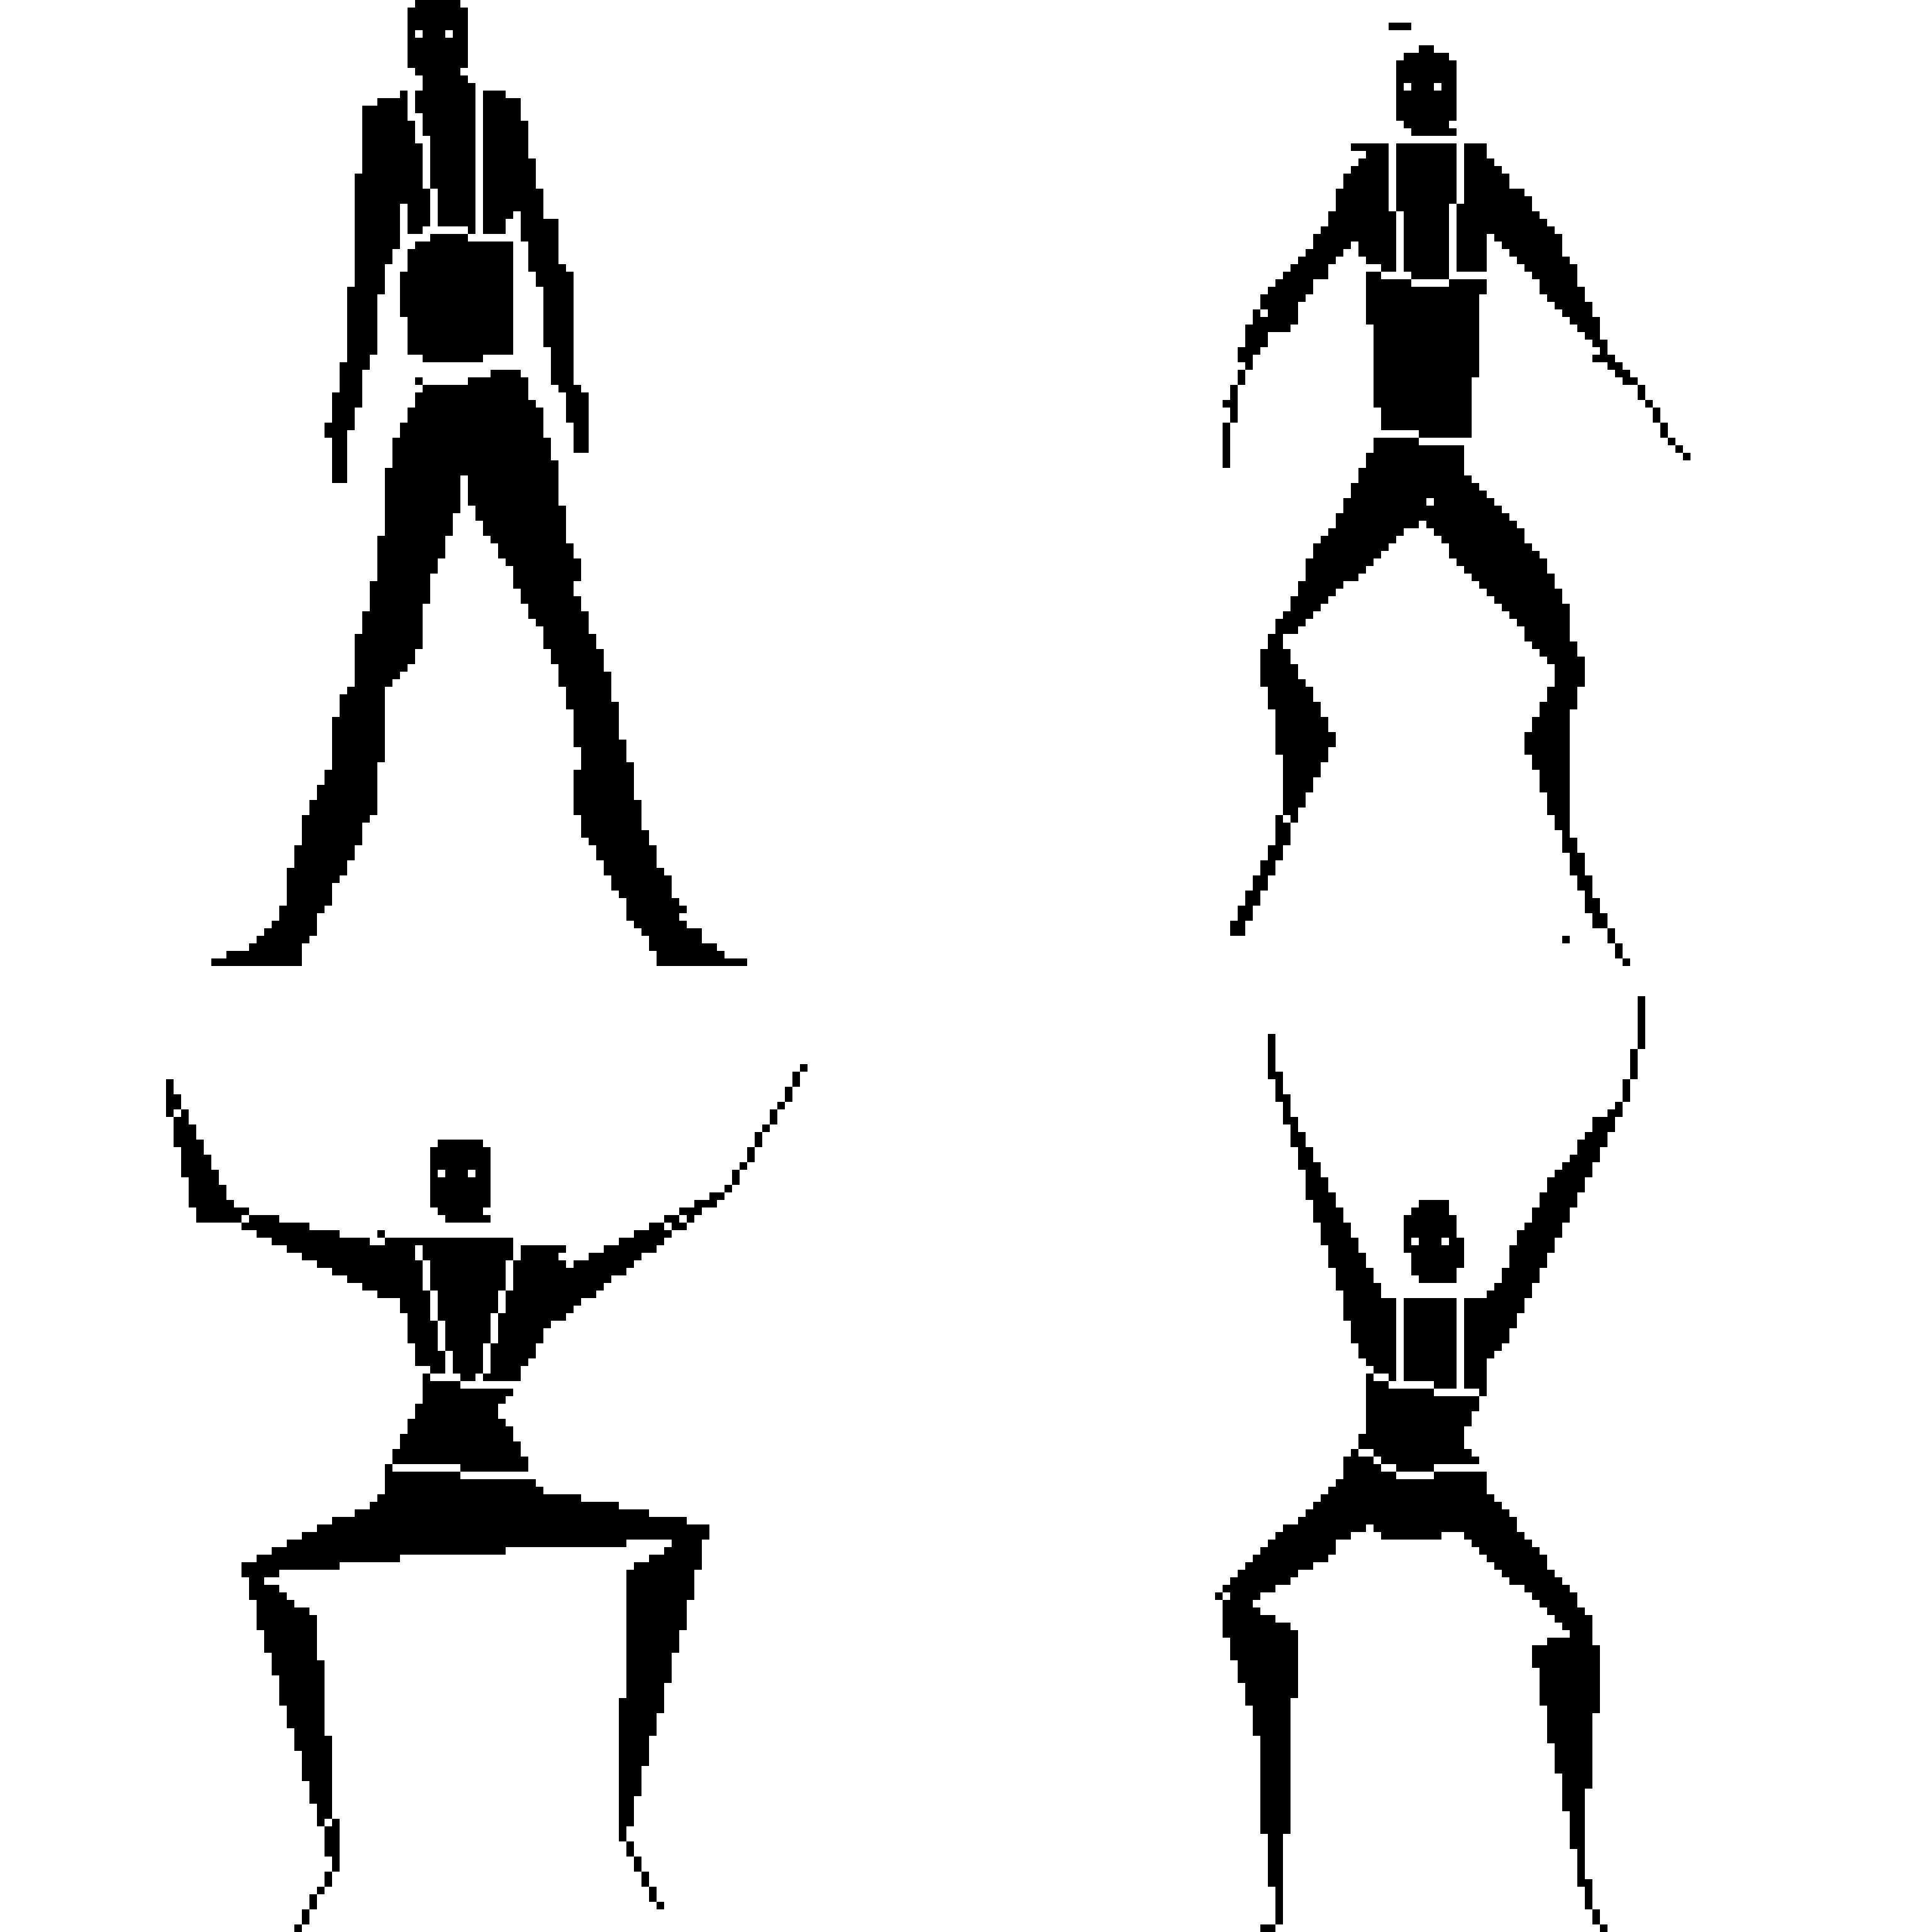
What makes a man a man and a woman a woman
Take these four silhouettes from left to right. With one small change the 2nd figure looks more like a woman than the first figure. This is because it appears that the hips are wider. We know that the key difference between a man and a woman is that a woman can bear children and a man can't. Thus, without the wider hips (which are for the purpose of child bearing) this detail says, "woman."
With an additional detail (the breasts), the next figure looks even more like a woman (the breasts are for the purpose of producing milk for the baby). Thus, another detail that says "woman" is the breasts.
One final detail that distinguishes a woman from a man is long hair.
There are other details but these three are key details that distinguish the two.

-
Draw a Female eye:
- Draw a downward curve (Important)
- Draw a circle pupil (usually not the entire circle but part of it).
- Start from the outside and draw a partial upward curve.
- Draw the lash tip going up from outside corner of the eye (Important detail)
- Draw a thin arched eyebrow (important detail),
- Draw complete the eyebrows with a tapered triangular shape.
- Color in the eyebrow
- Color in the pupil.
- Add the highlight.
The key details of a female eye are the lashes and the thin eyebrows.

The important details here is the curve of the top and bottom of the eye, the extended lash in the corner, and the thin eyebrows. The details that distinguish the male eye is the rectilinear shape and the thick eyebrows.

-
I've figured the best way to make a pixel art tutorial is visually The program I use for my art is called Piskel. I use the offline version. I have been testing several apps on the iPad like Pixel Art Pro and Pixure also, but they don't have all of the features I like to use.
I think the largest you would ever have to make your canvas is 128x128. These dimensions provide a great amount of details and not too much where it is difficult to animate the character.
Hope these examples help!
great tutorials . Piskel app is fantastic. It's offline, online, open source and just works. Also built for this purpose and adding animation is simple. Cannot recommend enough. I've been using Piskel as an art program for almost a year now and I love it. Im using my XP-Pen Artist 12 Pro tablet monitor , a perfect product for pixel art.
Hello! It looks like you're interested in this conversation, but you don't have an account yet.
Getting fed up of having to scroll through the same posts each visit? When you register for an account, you'll always come back to exactly where you were before, and choose to be notified of new replies (either via email, or push notification). You'll also be able to save bookmarks and upvote posts to show your appreciation to other community members.
With your input, this post could be even better 💗
Register Login